If you’ve heard commands like “set active thumb left” or “set active thumb right” in a shortcuts list and had no idea what they meant, you’re not alone. The thumb is just the small slider handle you use in Preview mode to move through your print, one step at a time.

Think of it like the scrubber dot on a video player. You can drag it with your mouse to jump around, but you can also use the arrow keys once you’ve clicked on it, which gives you much finer control. That’s exactly what the thumb does in PrusaSlicer, except instead of scrubbing through a video, you’re scrubbing through your print layer-by-layer and code-by-code.
PrusaSlicer has two main views, and it helps to know the difference before the thumb makes any sense. The Editor view is where you arrange your model, resize it, and get it positioned on the plate. The Preview is where you see the actual tool path your printer is going to follow, layer by layer, from movements to the retractions.
A simple way to think about it: the Editor is like laying out your ingredients on the counter before you cook. The Preview is like watching a video of the whole dish being made, step by step, so you can catch a mistake before it ends up on the plate. The thumb only exists in Preview, because that’s the view built around movement through time and space rather than static arrangement.

The shortcut for the Editor (3d) view is ⌘5
The shortcut for the Preview is ⌘6
The vertical slider controls which layer of your print you’re currently looking at. Instead of dragging the thumb with your mouse and hoping you land on the exact layer you meant to check, you can use the up and down arrow keys on your keyboard for the same task.
Each press of an up and down arrow key moves you exactly one layer, no more and no less. That means you can step through an entire print from the bottom to the top without skipping over anything by accident. It’s a bit like flipping through a flipbook one page at a time instead of fanning through the pages with your thumb and missing half of them.
The horizontal slider works differently. Instead of moving you between layers, it moves you along the actual tool path within a single layer, following the exact route your nozzle will travel. Use the left and right arrow keys here, and you’ll notice the G-code panel on the left side of the screen updating in sync with the thumb’s position.
This is closer to scrubbing through a video frame by frame to find the exact moment something happens, rather than dragging the scrub bar and guessing where you landed. You can watch your printer’s planned movements one small step at a time, which is a lot more precise than trying to eyeball it from the full layer view.
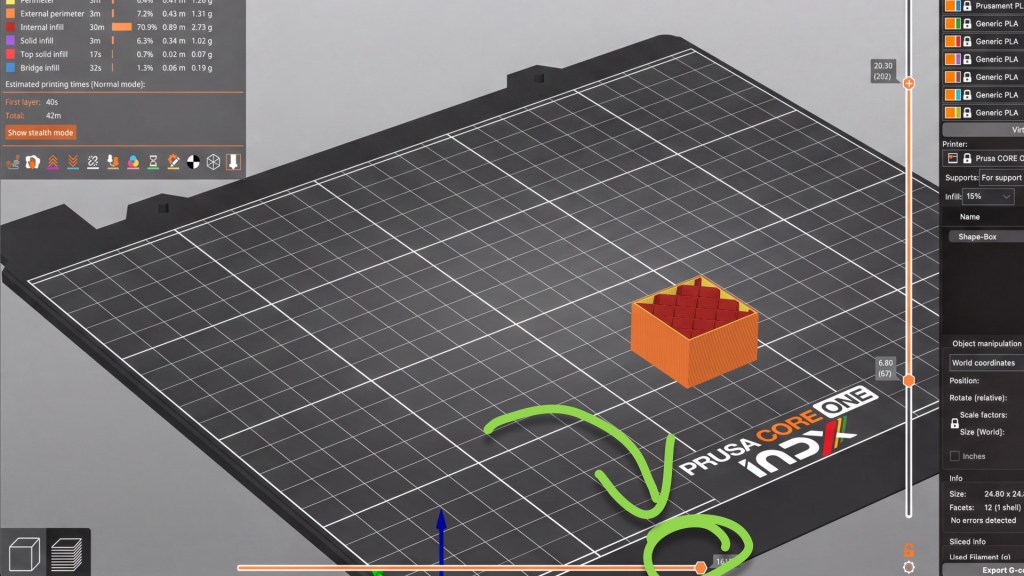
⌘ or shift button on your keyboard with the Up, Down, Left, and Right arrows to scroll at 5 time the normal speed.Here’s where this actually becomes useful instead of just a neat feature. If you print the same object over and over and it keeps failing in the same exact spot, you can use the horizontal slider, left and right to scrub straight to that point in the tool path and watch exactly what the printer is doing there.
It’s a bit like a mechanic asking you to drive to the exact spot where your car makes that strange noise, instead of just guessing based on how the whole drive felt. When you can see precisely what the nozzle is doing right before the failure point, whether it’s making an abrupt direction change or something else entirely, you have a real shot at figuring out what to


The short version: the up and down arrow keys move you through your print one full layer at a time. The left and right arrow keys move you through the tool path within a single layer, letting you watch the G-code update as you go. Both give you far more control than clicking and dragging with a mouse ever could.
“X”Once you know the difference between these two sliders, checking a model in Preview before you print becomes a genuinely useful habit instead of a step you skip. And if you’re the type who prints the same handful of objects often, learning to scrub straight to a trouble spot can save you a lot of wasted filament.
If you what to watch the video about the “Thumbs”, Click the link below

Anyone can suggest a change to this post. Your suggestion goes to the author for review.
Comments